I've been playing round with that tank top we made earlier and have added several things that I thought you might be interested in. The first, and most important is the fabric itself. I've found a way of giving the fabric a kind of randomized look that I think really works well. Take a look at this picture to the right and see of you don't agree.
The second thing is to make the fabric pull up at the points the straps attach. It looks much more realistic. Its really pretty easy to do.
The third thing is a fancier trim. If you click on the image above it should enlarge for you, and clicking it again will likely enlarge it again. If you do that you'll see that the trim and straps are little circles rather than the simple line of fabric I had before.
Oh, and yes! .... I'm pregnant! And yes, my due date is REAL SOON NOW!! Thank God!
Let's talk about how to make the fabric first.
The fabric for this top is made from two layers. The darker layer is pretty much the the same sort of thing we did before, but I left off the detailed texturing of this layer. The lighter layer has two parts - the main part that is pretty much the same as the darker layer, just a lighter color. The other part is the Layer Mask. This mask is mostly white, but with black pleaces where we want the fabric to be transparent. The transparency lets the lower, darker, layer show through.
So Step 1 and 2 is to create each of these layers and choose colors you like. I chose a kind of dark rose for bottom layer. I used the 'paint chip' way of choosing the colors for the upper layer and the trim/straps. You know, when you go to the paint store and get those cards with three colors on them of different lightness or darkness but all the same hue? In this case I just modified the lightness (Saturation in the HSV scheme of things) of the original dark rose. So the upper layer is a lighter version of the 'same' color, and the trim and straps are a lighter version yet.
The interesting part of this fabric is to create the Layer Mask for the upper layer.
I'll quickly sketch out the steps I went through to do this and then talk a bit about them:
- Create a new fabric as you did for the above two, but make this one a rather darkish grey. Not quite pure black but not too far from it either.
- Use Filter->Noise->HSV Noise, setting the Holdness and Hue to the smallest values you can, then play with S and V to create a peppering of white speckles in the darkish grey.
- Use Color->Desaturate to get rid of the colors that have crept in.
- Use Filter->Blur->Gaussian Blur to spread out the random speckles. Remember to use your paths to put selection borders around the fabric again, it will confine your blur and keep it from spreading out to places you don't want it to go.
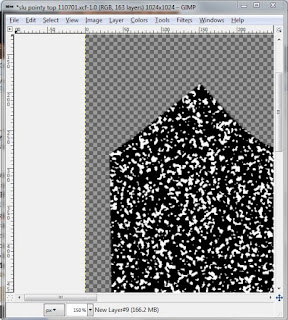
- Use Color->Threshold... use your mouse to grab the little pointer thingie and move it to the left. Watch your Layer-Mask-to-be and you'll see random white holes open up in it.
 After this, you should have it looking rather like this picture to the picture below... your randomness will be different than mine, though. (Duh!)
Pretty neat! Huh?!
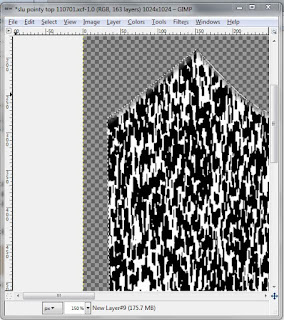
Ok now look at the finished product again. As you study it I think you'll see that there's a kind of vertical bias to the randomness. That's not what we have here at all. This is more of a peppery, clumpy randomness. Nice in its own way, and it might be just what you want.
Also, we need to invert the colors. Make white black and black white. The reason for this is that black is the color in a Layer Mask that allows the transparency and white is the color that shows the layer as it appears.
So.... a few more steps are called for:
- Use Color->Invert to reverse black and white
- Use Filter->Blur->Motion Blur and set the length to 12 and the angle to 270. Remember to surround the area with your selections again (from your paths) so you can control the blurring.
- Use Color->Threshold as you did above to turn the blurred version into something more crisp, and make she holes (the black parts) the size you'd like.

We're about ready to use it as a Layer Mask now. Turn off the selection if its on (ctl-a), make sure you have the layer selected and copy it to your clipboard (ctl-c).
Now make the light layer we created at the start active, right click and choose Add Layer Mask. When offered an option choose White. That will let the whole layer show. .... Then making sure that the layer is still selected, past the Layer Mask you have made to the one you have just created by pressing ctl-v. Press the 'anchor' icon at the bottom to complete the operation.
Now comes the arty part.
I think its a good idea to make the sharp lines fuzzy again. Use Gaussian Blur to do so - by now it is an old friend. If you'd like to make the 'holes' bigger you can do so directly on the layer mask. Use the Gaussian Blur / Threshold trick we used above. You can do this as many times as you like until it looks good to you.
I also like to edit the layer mask directly and make the top part a little less 'holey' so its connection to the top trim is not quite as tenuous. If you right click on the layer, and make sure 'edit layer mask' and 'show layer mask' are both checked. (Be sure to uncheck them before you make the texture)
Here's what my fabric looks like after all of that.
Whew! That's enough for now!
I know, I know. I didn't tell you how to do the other two things I mentioned at the top of this post. But really, this is long enough... don't you think? Perhaps I'll leave it as 'an exercise for the student'. *snickers*
No, really. I'll go through them in the next post. But I'll bet you can figure it out for yourself.
robin


No comments:
Post a Comment