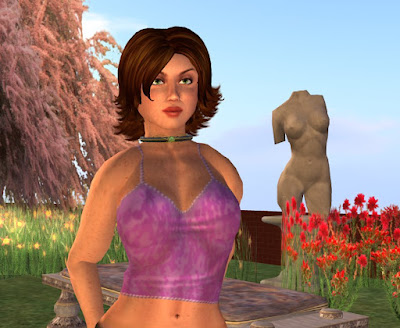
A few posts back, I showed you how to make a nice tank top. Then I showed you how to do some variations on the theme and ended up with a very nice tank top with a kind of randomized fabric. It was kinda putzy to make though and if you wanted to make several versions in different colors... well it would quickly become tedious.
Soooo....
I thought I'd show you a little short-cut. A way to change the color without having to create the entire top. The trick is to use something called "Rotate Colors".
If you're reading this and stratching your head, saying things like 'what tank top? what randomized fabric?' then you may need to go back and look at some previous posts. Here are some that are germane in reverse order (newer first, older last):
- Randomized Fabric
- Making a Tank Top ... this is the first of a series and it starts with a small GIMP lesson.
- Tools you'll need ... this is near the very beginning of the blog and is the start of a series to make a female skin. You will not need to go into that in detail but there might be some GIMP things in that series you need to know.
And yes, the baby is born. She is a bouncing baby girl and at birth was 8 lbs 6 oz. (ouch!) Mommy and little Fiona are doing fine.
First a few words about this pink/rose tank top.....
Recall that we used the same Hue on all of the colors we used in our randomized fabric above. That's the H in the HSV color scheme. So we just varied the Saturation and/or Value as we created our new colors. Also recall that there are just three colors in the above. The fabric itself has a darker background and a randomized lighter foreground. The trim is the same Hue and lighter yet. All have bump maps applied to them. On the background fabric and the randomized fabric, these bump maps create wrinkles. On the trim they create a kind of 3d-ish look, a nice rounded bump for each little bump that makes the trim. And finally, we happily took Eloh Eliot's layers from her Starlight Skin to create the highlights and shadows that apply to all.
Now, exactly how do we change the color?
What we need to do is to change the Hue of four layers: The background fabric layer, The randomized fabric layer, The straps layer and The trim layer. So here's what we we do:
- Select the background fabric layer in GIMP's layers window,
- Then go to the Image window and choose Colors->Map->Rotate Colors.
- I wanted to shift the Hue to more of a Purple/violet with just a touch of red in it...so I rotated the two arrows clockwise about 80 degrees so they encompassed the that area on the spectrum shown in the bottom circle. The values I ended up with were 1.580 and 1.8180 in the two fields. You can choose some other color to shift to - but make sure to note the values... you will need to apply the SAME value to the other layers.
 Now select the randomized layer of the fabric and apply the same rotation (you copied down the values... right?). Then do the same thing to the two trim layers.
One trick that I may have mentioned before to lighten or darken the whole thing after you have created it is to add a white layer above all of your fabric and trim layers and set the mode to grain extract or grain add. Then use the opacity to control how much is extracted or added. Its an easy way of getting the final lightness or darkness you want without having to redo the whole thing.
When you're happy with your result be sure to save the file and give it a different name. As usual, I appended a YYMMDD thing to the end of mine as I saved the XCF file (GIMP file). Then I saved the same thing as a png for uploading into second life. (See some of the previous posts on details on how to do that).
You can see my result above. Pretty nice isn't it!?! You can see that the wrinkles came over nicely and if you look closely you'll see the 3d-effect in the trim as well.
Have fun!
robin
